


Custom Search Solution – Part 3
- Jul 18, 2017
- 7 min read
This is the Part 3 in a multi-post series where we explore a custom Enterprise Search solution I designed for one of my clients.
In Part 1, I described the series, the client environment, an overview of the project requirements and presented an overview of the implementation steps.
In Part 2, we looked at implementing Managed Metadata Configuration to standardize metadata used in various document libraries.
In Part 3, we cover Step 2 - Create and Configure a Content Type Hub
This step shall include the design and provisioning of a Content Type Hub to allow the centralized management of the content types used in multiple site collections.
SharePoint supports accessing content types from one site collection to another site collection through content type hub. In these steps we will set up a Content Type Hub (which is a part of the Metadata Service Application), which is a hub for all Content Types that other Site Collections can subscribe to. That is you only need to manage your content types in one location.
1.Create a new site collection for the Content Type Hub
2.Navigate to Application Management > Site Collections > Create Site Collections
3.Choose the web application http://intranet.NALCO.com
Title: Content Type Hub
URL: http://intranet.NALCO.com/sites/ContentHub
Template Selection:
Select experience version: 2013
Select a template: Collaboration > "Team Site"
Primary Site Collection Administrator:
Secondary Site Collection Administrator: NALCO\sjones

4.Navigate to the Content Type Hub site collection features
Site Settings > Site Collection Administration > Site Collection Features
5.Activate the feature "Content Type Syndication Hub"

6.Create Site Columns for use in the new content types
Site Columns
Brand
Country
DocTypeCode
Document Type
Language (Should be a default Base Column)
Language Code
Market Segment
NIC Code
Product Line
Region
Category
Product Number
Product Name
Version Date
Version Number
Entry Date
Document Description
Document ID
File Format
Bulletin Title
Published Date
7.Navigate to the Content Type Hub Site Settings
8.Create a new site column: Site Settings > Web Designer Galleries > Site Columns and click on Create
Brand
Name: Brand
Type: Managed Metadata
Group: New Group - Nalco
Description: Enter if desired
Required: No
Unique: No
Multiple Value Field: Do not check
Display Format: Display term label in the field
Term Set Settings: In the window, choose the Nalco > Brand term set
Allow Fill-in: No
Default Value: leave blank


9.Create Site Columns for the rest of the site columns using the same steps as above.
Country
Name: Country
Type: Managed Metadata
Group: Existing Group - Nalco
Description: Enter if desired
Required: No
Unique: No
Multiple Value Field: Do not check
Display Format: Display term label in the field
Term Set Settings: In the window, choose the Nalco > Country term set
Allow Fill-in: No
Default Value: leave blank


DocTypeCode
Name: Country
Type: Managed Metadata
Group: Existing Group - Nalco
Description: Enter if desired
Required: No
Unique: No
Multiple Value Field: Do not check
Display Format: Display term label in the field
Term Set Settings: In the window, choose the Nalco > DocTypeCode term set
Allow Fill-in: No
Default Value: leave blank


Document Type
Name: Document Type
Type: Managed Metadata
Group: Existing Group - Nalco
Description: Enter if desired
Required: No
Unique: No
Multiple Value Field: Do not check
Display Format: Display term label in the field
Term Set Settings: In the window, choose the Nalco > Document Type term set
Allow Fill-in: No
Default Value: leave blank


Language Code
Name: Language Code
Type: Managed Metadata
Group: Existing Group - Nalco
Description: Enter if desired
Required: No
Unique: No
Multiple Value Field: Do not check
Display Format: Display term label in the field
Term Set Settings: In the window, choose the Nalco > Language Code term set
Allow Fill-in: No
Default Value: leave blank


Market Segment
Name: Market Segment
Type: Managed Metadata
Group: Existing Group - Nalco
Description: Enter if desired
Required: No
Unique: No
Multiple Value Field: Do not check
Display Format: Display term label in the field
Term Set Settings: In the window, choose the Nalco > Market Segment term set
Allow Fill-in: No
Default Value: leave blank
NIC Code
Name: NIC Code
Type: Managed Metadata
Group: Existing Group - Nalco
Description: Enter if desired
Required: No
Unique: No
Multiple Value Field: Do not check
Display Format: Display term label in the field
Term Set Settings: In the window, choose the Nalco > NIC Code term set
Allow Fill-in: No
Default Value: leave blank
Product Line
Name: Product Line
Type: Managed Metadata
Group: Existing Group - Nalco
Description: Enter if desired
Required: No
Unique: No
Multiple Value Field: Do not check
Display Format: Display term label in the field
Term Set Settings: In the window, choose the Nalco > Product Line term set
Allow Fill-in: No
Default Value: leave blank
Region
Name: Region
Type: Managed Metadata
Group: Existing Group - Nalco
Description: Enter if desired
Required: No
Unique: No
Multiple Value Field: Do not check
Display Format: Display term label in the field
Term Set Settings: In the window, choose the Nalco > Region term set
Allow Fill-in: No
Default Value: leave blank
Category
Name: Bulletin Category (Must use a different name here because there is already a default Core Column called "Category" which is a single line of text.
Type: Managed Metadata
Group: Existing Group - Nalco
Description: Enter if desired
Required: No
Unique: No
Multiple Value Field: Do not check
Display Format: Display term label in the field
Term Set Settings: In the window, choose the Nalco > Category term set
Allow Fill-in: No
Default Value: leave blank


Product Number
Name: Product Number
Type: Single Line of Text
Group: Existing Group - Nalco
Description: Enter if desired
Required: No
Unique: No
Default Value: leave blank

Product Name
Name: Product Name
Type: Single Line of Text
Group: Existing Group - Nalco
Description: Enter if desired
Required: No
Unique: No
Default Value: leave blank
Version Date
Name: Version Date
Type: Date and Time
Group: Existing Group - Nalco
Description: Enter if desired
Required: No
Unique: No
Date and Time Format: Date Only
Display Format: Friendly
Default Value: (none)


Version Number
Assuming you are not going to be tracking the actual version number and instead wish to manually enter the version number with each document.
Name: Version Number
Type: Number
Group: Existing Group - Nalco
Description: Enter if desired
Required: No
Unique: No
Minimum Allowed Value: 1
Maximum Allowed Value: leave blank
Number of decimal places: 0
Default Value: leave blank

Entry Date
Name: Entry Date
Type: Date and Time
Group: Existing Group - Nalco
Description: Enter if desired
Required: No
Unique: No
Date and Time Format: Date Only
Display Format: Friendly
Default Value: (none)

Published Date
Name: Published Date
Type: Date and Time
Group: Existing Group - Nalco
Description: Enter if desired
Required: No
Unique: No
Date and Time Format: Date Only
Display Format: Friendly
Default Value: (none)
Document Description
Name: Document Description
Type: Multiple Lines of Text
Group: Existing Group - Nalco
Description: Enter if desired
Required: No
Allow unlimited length in document libraries: No
Number of Lines for Editing: 6
Type of Text: Enhanced rich text
Append Changes to existing text: No

Document ID
Assuming you do not wish to use the Document ID Service to assign IDs to documents in the site collections (which can be used to retrieve items independent of their current location in the site collection).
Name: Document ID
Type: Managed Metadata
Group: Existing Group - Nalco
Description: Enter if desired
Required: No
Unique: No
Minimum & Maximum allowed values: Leave blank
Number of decimal places: 0
Default Value: leave blank
Bulletin Title
Name: Product Name
Type: Single Line of Text
Group: Existing Group - Nalco
Description: Enter if desired
Required: No
Unique: No
Default Value: leave blank
File Format
Name: File Format
Type: Choice
Group: Existing Group - Nalco
Description: Enter if desired
Required: No
Unique: No
Choices:
DOC
DOCX
XLS
XLSX
PDF
Any others you need to track
Display Choices using: Drop-down buttons
Allow "fil-in" choices: No
Default Value: Blank


10.Create Content Types
Navigate to Site Settings > Web Designer Galleries > Site content types
Click Create
Content Types
Product Document
Product Bulletins
Safety Data Sheet
Product Document
Name: Product Document
Description: Enter if desired
Parent Content Type:
Select parent content type from: Document Content Types
Parent Content Type: Document
Group: New Group - Nalco

Configuration
Add columns to the content type.

Add from Existing Site Columns.
Choose the Nalco Group.
From available columns choose:
Brand
Document Type
Country
NIC Code
Choose the Base Columns Group
From available columns choose:
Language

Alter the column order:

Product Bulletins
Name: Product Bulletin
Description: Enter if desired
Parent Content Type:
Select parent content type from: Document Content Types
Parent Content Type: Document
Group: Existing Group - Nalco

Configuration
Add columns to the content type.

Add from Existing Site Columns.
Choose the Nalco Group.
From available columns choose:
Bulletin Title
Bulletin Category
Document Description
Market Segment
Product Line
Published Date
Version Number
Language
Choose the Base Columns Group
From available columns choose:
Language

Alter the column order:

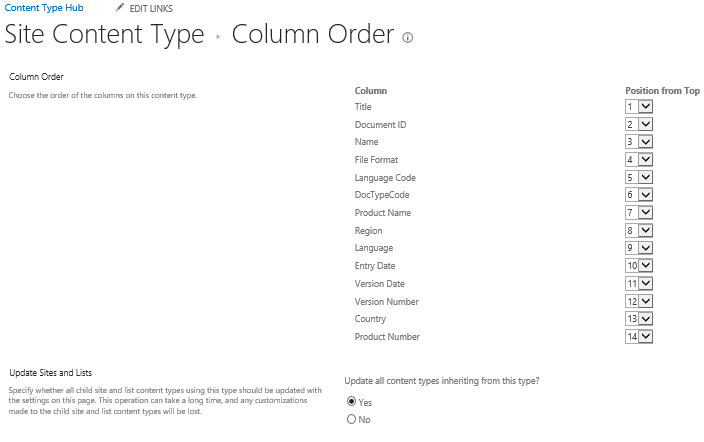
Safety Data Sheet
Name: Safety Data Sheet
Description: Enter if desired
Parent Content Type:
Select parent content type from: Document Content Types
Parent Content Type: Document
Group: Existing Group - Nalco

Configuration
Add columns to the content type.

Add from Existing Site Columns.
Choose the Nalco Group.
From available columns choose:
Document ID
File Format
Language Code
DocTypeCode
Product Name
Region
Entry Date
Version Date
Version Number
Country
Product Number
Choose the Base Columns Group
From available columns choose:
Language

Alter the column order:
11.Configure Managed Metadata Service for Content Type Hub publishing
12.Log into Central Administration for your SP Farm.
13.Navigate to Application Management > Manage Service Applications
14.Click to HIGHLIGHT the Managed Metadata Service.
15.Click the Properties button in the ribbon.
16.Enter the full path URL to the site collection used for the Content Type Hub.

17.Click to HIGHLIGHT the Managed Metadata Service Connection
18.Click the Properties button in the ribbon.
19.Check the box for "consumes content type from the content type gallery”
20.Click OK.

21.Publish the Content Type
22.Navigate back in the Content Type Hub site.
23.Choose each of the content types just created:
Product Bulletin
Product Document
Safety Data Sheet
24.Click on Manage publishing for this content type.
25.Click the button for "OK"
26.Navigate back to Central Administration
In order to receive the published content types immediately in the subscribers, you can go and run two timer jobs immediately: Go to Central Admin and run the timer jobs:
Content Type Hub
Content Type Subscriber (of the web application which is going to receive the content type’s updates)
Your SP Admin should do this.
Also note that the content types and managed properties will not actually be retrievable until a full crawl is performed by the SP Admin.
We continue in the next article with Step 3 – Create an Enterprise Search Center


Comments